


Making of the "Observations" Articles
by Jörg Hillebrand and Bernd Schneider
Compiling Observations (SD)Preparing the Article (SD)Preparing the Article (HD) Adding Observations (HD)Final Adjustments
 Some visitors ask how much work it is to prepare a new page for EAS. It mainly depends on the amount of research and, of course, on the length of the article. We have summarized the basic steps on the example of an article on a TNG episode in the "Observations" section.
Compiling Observations (SD) by Jörg
Here is what I am doing for each "Observations" article about a particular TNG episode.
1. Look into my existing screenshot folder of the episode. The folders contain shots of all aliens, ships, people, places, planets, planet surfaces, objects and other stuff that I found interesting over the course of the past ten years (the oldest TNG caps date back to the year 2002). This is when I notice the first couple of things for the article. I copy the according screenshots to a new folder.
2. Watch the episode at least 5 to 10 times in quick motion, using PowerDVD. Each time I focus my attention on a particular set or ship model. I take new screen caps for my episode folder, because 10 years ago I usually didn't take complete sets of caps of every room on the Enterprise.
- The first pass is always for exterior shots of the Enterprise-D, and I take between 15 to 50 new caps of the ship. These caps allow to find out whether a new shot was taken for an episode or whether there are already similar shots available.
- In the second pass I only take screen caps of engineering and of corridors, for instance, and I watch out for any changes, bloopers or other noteworthy observations.
- In the next passes I focus on other rooms or starships, of which I take new caps likewise, to illustrate something like changes in CG effects.
While I'm watching the episode I always make further observations for the article, of which I take notes in order not to forget them.
3. Investigate the Enterprise-D shots with Visual Similarity Duplicate Image Finder. So I can find out whether a particular shot of the Enterprise-D has already been used in an earlier episode (or will appear in a later one). This is usually not necessary for alien ships, which sometimes appear multiple times, but only in certain episodes whose screen caps I can compare quickly without additional tools. In order to find out whether a planet or a ship was previously seen, I can sift through the "Re-Used Planets" and "Re-Used Ships" articles that I prepared for EAS, since I am unable to remember each and every re-use that I ever found. The same goes for some of the props, on which we already have several articles too.
4. One thing that I additionally pay attention to is the re-use of props that were rented from Modern Props or of consoles that were created for the Star Trek production. For these I have two separate subfolders and two Word documents, in which I place the inventory number and description of Modern Props, a screen cap and the episodes in which they appeared. It is similar with the article on consoles that were built for Star Trek. So I always have an overview of this aspect of the Star Trek production, and it all goes into articles that sum up all re-uses of all consoles. Two still incomplete articles about Consoles by Modern Props and Consoles Built for Star Trek are already available at EAS to this date.
5. Take screen caps of the observations for the article in the next pass in PowerDVD. Then I search for corresponding caps in earlier episodes or films, showing the same prop or set or something like the Enterprise-D from the same angle. This all goes into the "Observations" article and into the RAR file that I pass on to Bernd.
6. Write down the observations. I name the screenshots accordingly, starting with "01", just as in "01, Galaxy's child (1).jpg". Keeping the naming consistent is an essential step and takes accordingly long.
7. In some cases I ask Rick Sternbach, Mike Okuda, or Doug Drexler for advice, or other experts who worked on Star Trek then and today. They are so kind to allow the inclusion of their annotations, in which they confirm or refute my assumptions.
8. As the caps taken in the first couple of years are not up to today's standard any longer, I replace them with new ones. For this I have to dig up episodes of various other series to take new screen caps.
9. After I have written the article, I reduce the size of the newly created caps using IrfanView. The initial file size is a bit over 1000 kilobytes, the target size is under 100 kilobytes.
10. Click through the numbered screenshots in chronological order (which is no problem due to the file names that start with the chronological number) and look for possible missing caps.
11. Compress the annotations and caps with RAR and send them to Bernd.
Preparing the Article (SD) by Bernd
For this type of articles, Jörg Hillebrand is the one who does all the essential research. As described in the preceding chapter, he reviews the episodes, takes notes and produces screen caps. For each episode, Jörg sends me a RAR file with the following contents:
- A Word file with numbered annotations
- 80 to 160 screen caps (and optionally other images), whose names start with the number of the corresponding item in the annotations file
Once I have received his e-mail, I perform the following steps:
1. Create a new work directory for the episode, save the RAR file and decompress it.
2. Batch rename all image files with Advanced Renamer, part of FileMenu Tools. Jörg's naming scheme needs to be converted to an internet-compatible standard (no capital letters, no special characters, no spaces) to be fit for the website. This takes about 10, sometimes up to 20 passes in Advanced Renamer, depending on which special characters or second-level numbering the file names contain. The first pass is always the same and is quite simple: convert everything to lower case. The rest of the conversion needs the search-and-replace function. In the end, "19, Galaxy's child (2).jpg" has become "19-galaxyschild-2.jpg".
3. Open Jörg's annotations (Word) and save the file as plain text. A plain text file is necessary to allow drag & drop to Frontpage. Should I forget that and use the Word file as the basis, the result would be an absolutely atrocious HTML code full of Word-specific formats that would have to be eliminated manually (in which case it would be better to discard it and start from scratch).
Note This work flow is based on ancient software (Frontpage and Micrografx Picture Publisher). Essentially a few minor things could be done better with newer software, but the bulk of the work would still be the same. I'm using batch procedures wherever possible, for file renaming and for image processing.


4. Prepare the HTML template for "Observations". Save as "<episode>.htm", search and replace all occurrences of "EPISODE" with the episode name (in HTML source code, in order to include the title tag), insert the necessary number of new table rows, depending on the number of items in Jörg's annotation list.
5. Place the HTML file and the text file with Jörg's annotations side by side. Drag and drop the numbered annotations, one per table row.
6. Do some first text formatting, such as harmonizing the font and creating paragraphs.


7. Create a sub-layout with placeholders for the thumbnails and captions (where required) for each table row in the HTML file. To create the layout I first have to sort the image files alphabetically (that's one reason why they have to start with the item ID).
- In the easy case that there is just one image for a list item, I can leave the table row as it is.
- If there is a chronological sequence of images for one item ID, it is straightforward as well, as I simply have to split the table cell into the according number of rows.
- If there are additional images (usually comparison caps from other episodes), I have to create a special layout and include captions. The two possible table templates (for one or two additional images per row to the left of the chronological screen caps) are located on the bottom of my HTML template, so I can use copy & paste. In order not to blow up the layout, I have to insert <br> tags in case the caption exceeds the with of the thumbnail placeholder (exactly 107 pixels wide, just as the actual thumbnails that don't exist yet), so the longer episode titles will occupy two lines.
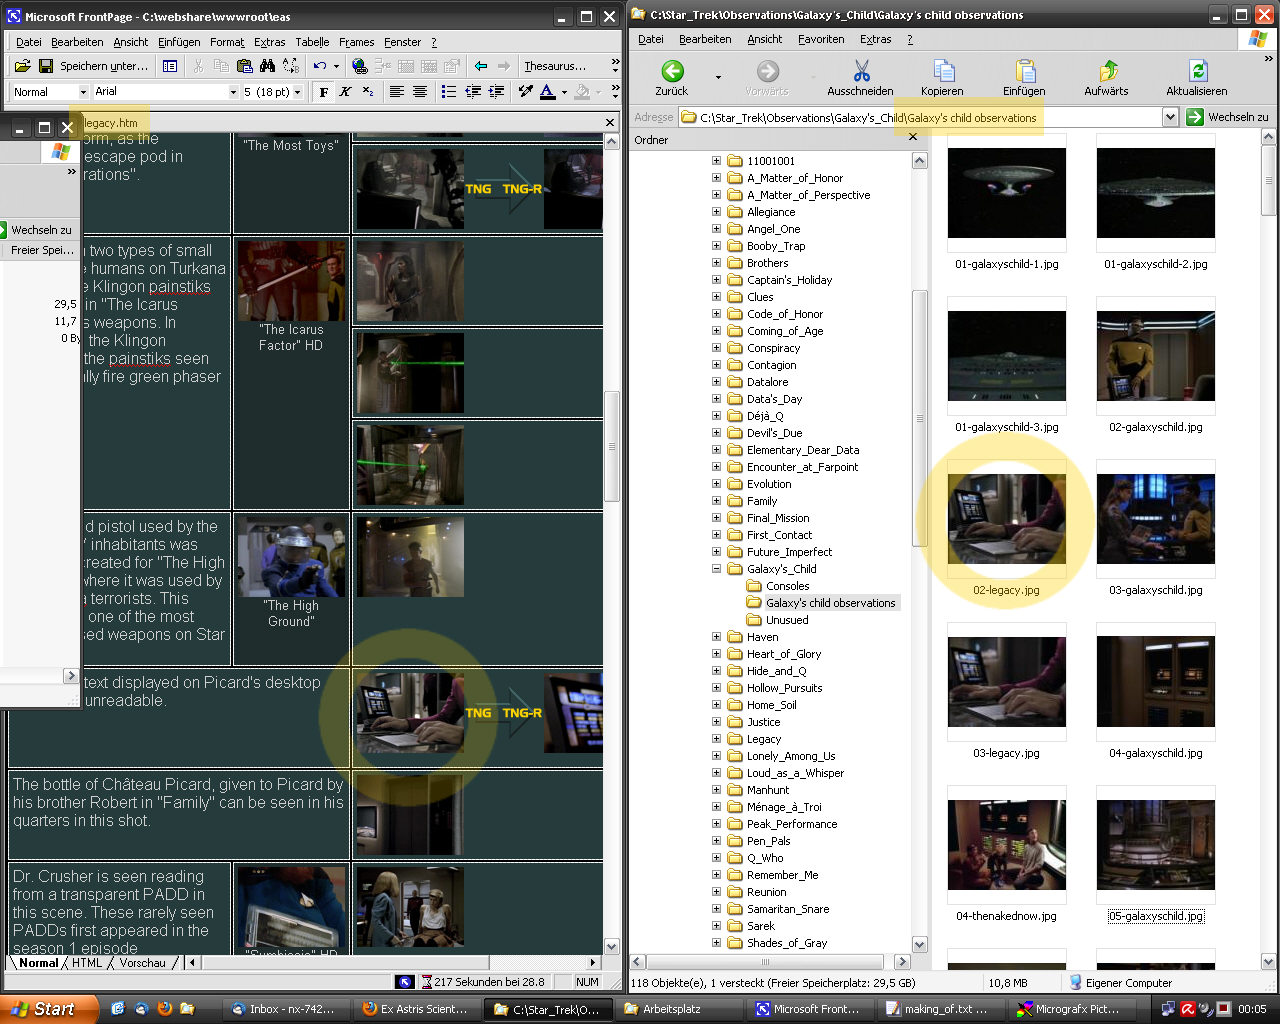
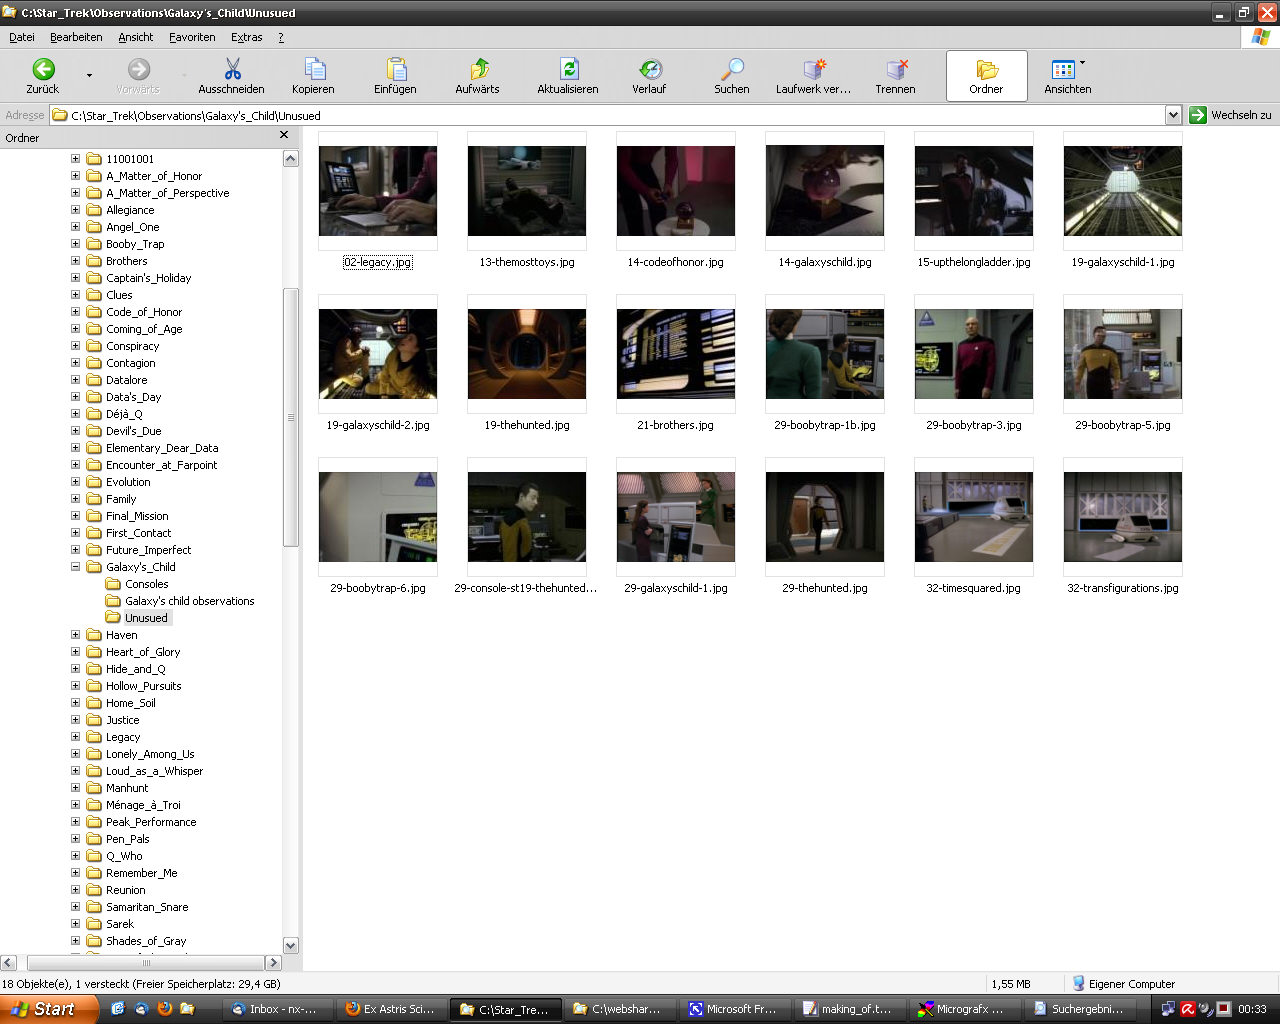
8. Check all new image files from Jörg's RAR whether they are already available, by going through already finished "Observations" articles and possibly other articles, such as the ones on re-used props. For instance, if Jörg sent me a new cap from "Legacy" that I need for the article on "Galaxy's Child", there is a good chance I can find it in the previously prepared "Observations in TNG: Legacy" article. If an image is already available, I don't need to process the new one that Jörg sent me, and I can move the latter to the "Unused" folder. This doesn't save a lot of work, considering that image processing is partially automated, but I hate having so many duplicate images on the site.
9. Prepare all "standard-size" images. Usually these are screen caps, in this stage of the work from the DVD release. DVD caps customarily don't have a definite "true" size. Jörg is so kind to use a standard size of 1200x896 pixels for the SD caps where possible, which facilitates my work a lot. I copy all these "standard" caps to an accordingly named work directory and run a script in my old Micrografx Picture Publisher, which does the following (if it doesn't crash, which happens frequently):
- Crop all images with an upscaled 640x480 pixels mask so that neither the ugly black frame is visible, nor too much of the useful area is lost. In case we want to show a microphone that pops into the frame at the very top, I have to single out and process that image manually, because the fixed-size mask applied in the automated procedure has to account for a couple of pixels of tolerance. And despite the tolerance I have to rework a couple of images manually, for which I can keep them open after the procedure.
- Adjust the gamma and contrast. This will make the previously dark gray space plain black as it should be, and brighten the other parts of the image in a way that details are better recognizable.
- Resize the image to exactly 640x480 pixels.
- Sharpen the image.
- Save (overwriting the old file).
As mentioned, I keep the images open in the editor and check them one by one. If the image is correctly cropped, I can simply close it because it has already been saved. If it needs to be reworked, it is almost always because the cropping left an ugly black border on the left or the right. I hit "undo" several times, move the mask in way that it doesn't touch the border and continue manually.
10. Prepare the rest of the images individually. This includes the aforementioned "microphone visible" caps, as well as caps from the movies (target size 800x400 pixels instead of 640x480), but also all 4:3 aspect ratio caps that are smaller than 1200x896 pixels. The mask procedure only works properly for exactly 1200x896 pixels. Perhaps a newer software would allow to automate the creation of images of a uniform target size from any initial size and would even recognize black borders. But considering that it I'm using Picture Publisher extremely intensively and it took me a decade to learn it, I'm not in for a learning curve of many years.


11. Create thumbnails. For this I copy the images to a work directory and run another batch job with Advanced Renamer to append "-t" to the file names, the EAS-wide standard for thumbnails. I have a Picture Publisher batch script for the thumbnail generation too, which works with all images that are exactly 640x480 pixels. It does the following:
- Apply a Gauss filter to blur the image. This is necessary to filter out high spatial frequencies that would otherwise lead to aliasing or steps in slanted lines when the size is significantly reduced. The built-in resampling algorithm is not sufficient for that.
- Reduce the image, using bilinear resampling, to exactly 107x80 pixels. This is the standard size for all thumbnails in the section. The thumbnail width determines the width of the cells in which they are placed and does not allow the slightest exceptions or tolerances.
- Sharpen the thumbnail.
- Save (overwriting the old file).
12. Move all images and the corresponding thumbnails from the work directories to the target directory inside my local copy of the site (more precisely, to a newly created child directory of "observations").
13. Open this image folder and the page side by side in Frontpage. Then, one by one, drag and drop the thumbnails to the page.
14. For each thumbnail, add a link to the full 640x480 version. Linking each thumbnail to the original large image previously required a lot of typing. But I came up with a regular expression that made my life much easier (especially for my fingers). I open an advanced text editor such as Notepad++, select "Replace" from the menu, check "Wrap around" and "Regular Expression" and run the following:
- Search:[\r\n\t ]+<img src="([a-z0-9\-\/]+)-t.jpg">
- Replace: <a href="\1.jpg"><img src="\1-t.jpg"></a>
This keeps the thumbnail name (everything in the parentheses in the search term) as "\1-t.jpg"g and adds the link to the full image as "\1.jpg".
15. Open related articles and make the according changes. For instance, Jörg often spots additional prop re-uses when he prepares an "Observations" article. I then add the image to the article about prop re-uses as well. This is a lot more complicated than simple drag & drop, as I have to rephrase and rearrange things, often on multiple pages, and it takes accordingly long. But there is no way that I could postpone this work because otherwise I would have to take precise notes, and moreover it would sum up to an unmanageable backlog at the end of the TNG-R season.
16. Do some fine tuning in the "Observations" article itself, such as adding links to related articles (about re-used planets, ships, props, etc.).
17. Open the HTML page in an advanced text editor, make sure that escape sequences are recognized, search for "</a>\n<br>" and replace with "</a><br>". This removes a random problem in links followed by a new line character "\n" and an HTML line break "<br>". This combination leads to a display error in Internet Explorer, which renders an extraneous line break (or vertical distance or whatever) before the "<br>".
18. Create the corresponding image folder on the server and upload everything. The article is preliminarily finished, until the HD caps become available. At this time the files are uploaded to a place where they can't be found. We need to prepare the articles a few months in advance but I will not release anything before it's ready and before it's the right time in chronological order of the episodes.
Preparing the Article (HD) by Bernd
1. I can obtain a basic set of HD caps from TrekCore or take Blu-ray captures myself. The latter is sometimes necessary to get a shot at an exact time code that is not available at TrekCore. It then requires an additional step to crop the image to 1438x1080 pixels. The next step now is to find the HD caps that correspond with the existing SD caps by Jörg. I particularly look for HD caps of the following:
- Planets (that were very often replaced with CGI)
- Starships shots (that were generally recomposed, and in some cases reconstructed with CG models)
- Matte paintings (because they may have been edited and because they simply look great in HD)
- Props and make-up (where the HD version allows to recognize more details)
- LCARS screens (that may be legible in HD for the first time or that may have been newly created)
I open the SD cap (from my preliminary article) and the HD cap (from TrekCore) each in one browser tab, copy the file name of the SD file in the address bar, and save the HD file under this very name in a new work directory.
2. Batch rename the newly collected HD caps, appending "-r" to the file name, the EAS-wide standard to tag screen caps from remastered episodes.
3. Edit the HD caps. I don't need to do anything (except perhaps apply a somewhat higher compression) with the HD caps if I keep them at their original size (which is 1438x1080 pixels since the third season). No color correction is necessary, and the aspect ratio is close enough to the required ratio of 4:3. For the first season, I reduced almost all HD caps in size though by resizing or cropping them (only excluding some great planet of ship shots). I did this to save disk space, and because of previously bad experiences with downloads of files in excess of 250 kilobytes on my old server. For the following seasons, I decided that it would be great to have more of the HD caps at the their full size in spite of everything. So I usually crop only those images of which only a small part (such as a door label) is really interesting, and I resize those caps that tell the whole story at 640x480 pixels just as well. I usually do this manually in Picture Publisher.
4. Create thumbnails. For this I copy the images to a work directory and run a batch job with Advanced Renamer to append "-t" to the file names, just as with the SD thumbs. The resizing is the same procedure as for SD caps.
5. Move all images and the corresponding thumbnails from the work directories to the target directory inside my local copy of the site (more precisely, to the child directory of "observations" where the SD caps are already stored).
6. Prepare the HTML file with the HD thumbnails. I previously inserted a "TNG to TNG-R" arrow in every row where an HD cap was available. This was still the easy part because after that I had to add the thumbnails of the HD images and then link them to the original images, with an awful lot of typing. But another regular expression became my best friend:
- Search:<img src="([a-z0-9\-\/]+)-t.jpg"></a></td>
- Replace:<img src="\1-t.jpg"></a><img \r\nsrc="tng-tngr.png"><a href="\1-r.jpg"><img src="\1-r-t.jpg"></a></td>
This procedure adds the "TNG to TNG-R" arrow, as well as a copy of the original SD thumbnail complete with the link, with the slight difference that "-r" is appended for the HD thumbnail and image, respectively. I now simply have to delete the arrow and the image again, if the latter produces a 404 error, which means that I didn't prepare an HD version.
7. Add descriptions of the HD caps to the table column on the very right.
8. Upload everything to the server. The article is still in a secret folder and not openly accessible.
Adding Observations (HD) by Jörg
1. As soon as I have the Blu-ray of the season, I first watch the complete episode for the first time at normal speed. At this time, Bernd has usually already downloaded the bulk of the HD screen caps and included the according annotations on changes from SD to HD. Watching the episode in HD, I pay attention to things that I may not have noticed so far or that are only visible in HD, and I supplement the observations accordingly. For this purpose I can insert number 04.1 between 04 and 05 if necessary.
2. Some observations are visible on just one particular frame, and the available screen caps may not show this very moment. I request an additional screen cap at the exact time code.
3. After I have received the additional HD caps, I crop them where useful and give them names according to my naming scheme. I often create new SD caps for additional observations for Bernd, including the descriptions. I pack another RAR file and send it to Bernd.
4. Over the course of time I occasionally make new observations and send them to Bernd. No article is ever finished, they are constantly being supplemented, updated or corrected.
It is my goal to write an "Observations" article for every Star Trek episode eventually. It will be particularly interesting beginning with TNG season 6, the time in which always two Star Trek series were in production, and we have to pay attention in which of the series a prop really appeared for the first time. Of particular interest are also the seasons during which a Star Trek movie was being produced in parallel, because we can see how a set was modified for the movie or how props created for the movie made it into the inventory of the series.
Final Adjustments by Bernd
1. After receiving Jörg's additions in HD, I unpack the RAR file, make the according adjustments to the text where necessary, process and insert the images and upload everything. The article remains unpublished for the time being.
2. Every article includes a link to the corresponding HD cap gallery at TrekCore. At some point it becomes obvious what the number and hence the URL of the gallery at TrekCore will be, so I can edit it accordingly.
3. It is time to post the article when its time in the chronological order of episodes has come and when the corresponding TrekCore gallery is ready for release too. I can now announce the new article on the following pages: Main Index, Updates, TNG Remastered Blog, RSS feed. In addition, I place links to the article on the Observations index and in the Sitemap, everything still in the local copy of the site, of course.
4. After thoroughly reviewing the page once more (it has sometimes been quite a while since the last edit), I move the HTML file on the server from the protected location to its final place where it is supposed to be found.
5. I can now upload the changed index page with the announcement of the new article and everything else. The article is published now. However, as Jörg mentioned, nothing is ever finished. Every few days there are corrections or additions to one of the already posted "Observations" articles.
See Also
Windows File Management - some tips for efficient file management for webmasters

Back to Technical Support index


