


Miscellaneous 2D Design Tricks
This is a supplement to the Starship 2D Design Tutorial, showing some more useful techniques.
Notice You may notice that I made this tutorial based on the German language version of iGrafx Image, so some names of the tools and menus I translated back may not be the same as they are in the actual English version. If you find something that should be corrected, please contact me.
Using the Bézier Tool
Every 2D software has a Bézier tool for drawing curves, and in many of them it is the only available tool for that purpose. The Bézier tool is dreaded for not being intuitive, and I know of many designers who have surrendered because they simply don't learn how to use it. To be honest, as I have more convenient tools available in Micrografx Designer, I don't use Bézier myself. However, as I made up my mind about it, I found it to be more logical than I first thought. Here is how it works.
Basically, the Bézier tool may be used for drawing objects with corners or with rounded corners, depending on how the mouse is used.
The first example shows an object without curved portions. It is creating by simply clicking the corner points one by one and then moving the mouse to the next point *without* holding down the button. The end point is determined by a double-click. This way, the Bézier tool has all the capabilities of a separate tool for drawing straight lines. But, in my opinion, it is a lot more difficult with the Bézier tool, at least in Corel Draw and Micrografx Designer where the line in progress is not interactively displayed while the mouse is being moved.
In the second example, the Bézier tool is used to give two of the points a curvature. The basic approach is the same as above. Single points are connected by simply clicking and moving to the next point with the button released. But if I hold down the button and drags the mouse while creating a new point, tangents will emerge from it into the direction of the previous and of the next point. The farther I drag the tangent's end point away, the straighter will the curve become in the respective point itself. At the same time, the curvature at the previous point will increase if the current tangent gets too close to the previous tangent or even to the point itself. And this is exactly the problem most users experience with the Bézier tool. They either tend to put the single points too close together, or they stretch out the tangents too far (or both). This will ultimately result in something like a sawtooth curve. Using the Bézier tool, I have to set points only where the curvature should change considerably (where there is supposed to be a soft kink). Two points close together are only needed where the curvature is going to reverse from convex to concave.

Before drawing a Bézier curve, it would help to have a polyline with the required points as a guideline for the curve. But it is not really necessary to draw two curves for that purpose. As the third example demonstrates, it is possible to modify an existing curve using the Bézier method. Although it works exactly like drawing a new curve, the curve modification is usually a separate tool. In Designer and newer versions of Corel Draw it may be accessed by simply double-clicking the curve. It may surprise that most users master this tool much better than the drawing tool. The reason may be that, once a curve exists, there is no anxiety to set the correct points, as it is possible to move the points and their tangents in any order and at any time with the possibility of undoing each action. Moreover, as one can always see the whole shape, it is much more intuitive how the curve will change when dragging the tangent end points.
Summarizing, for those who don't like the Bézier drawing tool, it will be most convenient to draw a polyline first and then modify the points. But don't make the mistake of trying to approximate the curve already with the polyline! As already mentioned above, it is important to set points only where the curvature is supposed to change or reverse. With too many points, a curve will always have slight steps in it. This applies to Bézier as well as to all other curve drawing tools.
Exact Mirroring of Oblique or Curved Objects
In technical design, it is often necessary to copy something across a mirror axis. For instance, when designing a starship, in the top view almost everything is symmetrical across the longitudinal axis, and some details are symmetrical across the transversal axis of the saucer too. Of course, no one would draw all the details twice, so they must be copied and mirrored at some time. But since only one half of the drawing hardly gives an impression of the whole, one wouldn't mirror everything at once at the very end (at least I wouldn't do that). So objects will most likely have to be mirrored one by one.
There are two basic approaches to creating a mirrored copy. The first is the exact solution, using a mirror axis. Most 2D programs have a "turn and mirror" dialog field that allows to determine a mirror axis of an object or object group (usually by moving the center of rotation onto the coordinate of the desired axis). This dialog field, however, is usually complicated to use. Moreover, very often the original and the copy are supposed to have a wide distance, and even though the mirror axis may be nailed down with a ruler that the object's center of rotation (or of mirroring in this case) will snap to, it is hard to see if the mirroring operation is accurate. Personally, I hate working with the sheet zoomed so far out that I can't see if, how and where I'm changing something.
The second mirroring procedure of standard software is the much faster and easier to use "flip in place" function, where an object is mirrored across its own center of rotation which is, by default, its geometrical center. The left and right (or top and bottom) edges will simply switch places. Micrografx Designer and Corel Draw have a button for that, and adjustments in a dialog field are not necessary. One disadvantage is that, after mirroring, the object has to be moved to its final location. But this is usually easy to find. The worse problem is that objects which are out of the grid will not fit with the rest of the drawing. This applies to most curves and almost all rotated objects, even if the rotation angle was exactly 90°.
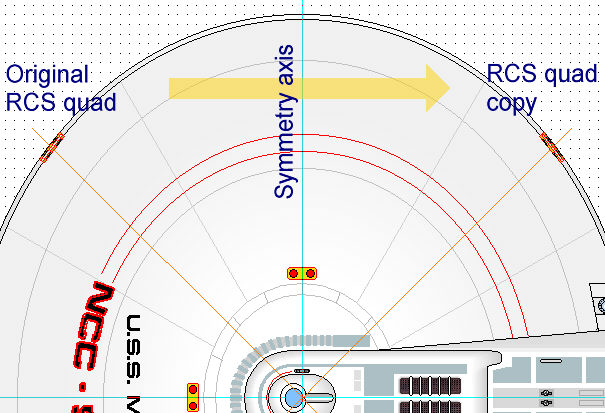
For instance, let us assume that we need to copy an RCS quad from the fore to the aft end of a saucer whose center is in the grid. If it is copied, mirrored in place and then moved from the fore to the aft end, it will not fit into the aft saucer edge. This is simply because, technically, the object outlines remain the same with respect to the grid. They are not mirrored. But as the example procedure shows, it is possible to mirror an object in place and mirror it relative to the grid at the same time. To accomplish this, a second object is needed, whose edges are outside the RCS quad and exactly in the grid. This may be a simple rectangle. Now the rectangle and the RCS quad are selected and mirrored together. As one can notice looking at the cyan rulers, the left (former right) edge has now the desired mirrored orientation relative to the grid which is out of the grid.
Summarizing, it may be more work than using the "turn and mirror" box to create exactly mirrored objects, but it saves the designer from working without seeing anything.
Arranging Objects in a Circle
Sometimes it is necessary to distribute objects equally. Every 2D program has a tool for either creating x-y arrays of objects or for distributing existing objects across a defined area or along an axis. It is somewhat more complicated to arrange objects along a curve. Recent software has tools for that (like already for text), but I don't think that they are convenient to use.
It is rather easy if objects need to be arranged in a circle using its normal turning handles. No special tool is needed for that. It only requires some consideration and preparation. In my example, a small rectangle needs to be duplicated several times, and the duplicates arranged in a circle around the bridge of the starship.
First of all, the common center of rotation has to be determined. This should be done with a horizontal and a vertical ruler. Make sure that "snap to rulers" is checked and, if possible, lock the rulers so that they can't be moved accidentally.
1. As soon as the first rectangle is in place (which should be at the outline of the later circle of rectangles), click on it twice (not a double-click, but slowly!). The handles around the rectangles will toggle from the resizing handles to the rotation/tilting handles. When the latter show up, you will also see the center of rotation which is, by default, in the center of the object.
2. Now you can move the individual center of rotation to the common center of rotation you have defined by the crossing point of two rulers. If you accidentally move a ruler (because the center of rotation is just underneath it), you need to lock it. If you're using Designer, make sure that your next click doesn't go anywhere else but into the object you want to duplicate and turn (otherwise the center of rotation will return to its default position).
3. You don't need to make a copy first and then move it. It is possible to do both in one step by simply holding down CTRL (at least in Windows) while turning the rectangle. Note that, in Corel Draw, this is not the default setting, but you should choose this in the Options menu, also to save you work with any other copy procedures. It doesn't matter which handle you use to turn the object, just drag it into the desired direction. Now the only problem is the precise angle. In Designer it is possible to define an angle for manual rotation in the Settings menu. For instance, you could choose 30°, so you will have 12 copies per full circle. The example uses 7.5°, yielding 12 copies per quarter circle. You get the idea. Select a divisor that will give you an integer number of copies per circle. The problem is that Corel Draw has no defined steps for manual turning, and you will have to do the fine tuning with the mouse until the copy is in the correct position.
4. You can go on copying and turning the original, but it is probably easier to always take the copy you have just created. You may complete the circle by using the mirroring procedure described in the chapter above. If you are once in the course of creating rotated copies, it may be easier to just go on with it until the circle is completed, though.
See Also
Starship 2D Design Tutorial - typical steps from simple outlines to a fully-fledged image with shading
Drawing Software Test - reviews of Micrografx Designer, Corel Draw and Adobe Illustrator

Back
to Technical Support index


